I serviced bikes for XOBA riders during the across-Ohio tour since 2006, and slept on the ground to do it in the sun and rain since 2007. I have co-directed other tours, ridden in many, and provided mobile assistance going back to the early ’90s. In the ’80s I was fixing bikes in my garage with minimal tools, so I’ve learned a few tips to share about preparing your equipment for a bicycle trip, and repairing them using in-the-moment and often primitive resources. Until 2016 supported the Across Ohio Bicycle Adventure conducted by Columbus Outdoor Pursuits, so have dedicated this page specifically for cyclists attending similar rides.
Among the most common repairs I addressed for people during the week:
- flats, and dry or worn-out tires
- poor shifting, and damaged or broken cables
- poor or noisy braking
- mis-adjusted bearings (or in poor condition)
- damaged, loose, or missing hardware (bolts, nuts, etc.)
- noisy drive-train (rusty, dry, dirty, or worn-out chain & gears)
- broken (or loose) spokes
- misaligned or missing computer magnet or sensor
- dead computer battery, or corroded electrodes
I’ve encountered these less common issues too, and a few may unfortunately indicate a premature termination of your tour:
- cracked, bent, or broken frame
- cracked, bent, or broken rim or hub
- broken saddle
- broken or missing bottle cages
- broken pedal or loose/missing cleat hardware
- damaged hub quick-release skewer
- worn, torn, or missing handlebar tape or grips
- old or missing brake pads
- loose, missing, or broken derailleur pulleys
- bent derailleur
- seized or gummed-up caliper or derailleur movement
- seized or gummed-up brake/shift control lever movement
- bent handlebar or stem
- seat-post damaged, or missing hardware
- misaligned or noisy (rattling or scraping) fender (or rack)
- uncomfortable or inefficient body-positioning fit parameters
I’ll be addressing many of these in some detail, over time, but this is a good starting list of the things you and your favorite bike shop should be checking closely, especially leading to your departure.
Finally, don’t leave home without your:
- gloves
- sunglasses
- water bottles
- helmet & mirror
- spare inner tubes, and emergency repair kit (inflation method)
- skin/chamois creme
- sunscreen (sport/sweat friendly)
- identification & cash
- mobile phone (kept in small ZipLock baggie)
- map case & clip
- socks and shoes
- rain gear
- laughter and sense of adventure
My role during the ride was to help get your equipment back to working order, as best as possible, when something went wrong. I was not there to do tune-ups and post-rain detailing. Some folks were hesitant to ask for help when they really needed it, and others asked daily for help with the impossible task of tuning a past-retirement bike into a smoothly running marvel. Every year we encountered the need to perform at least one miracle, often by the second day. It could be fun, if we succeeded, but the suspense could also be stressful for us both. My hope is this page might help us all enjoy a safer, easier, and more comfortable week of cycling adventure.
So, what should you do with your bicycle before an event, such as for a week long cross-state ride like XOBA, to ensure the most safety, enjoyment, and confidence in your bike’s condition and performance?
Let’s start with the obvious. If you are mechanically inclined and do most of your own maintenance, then you probably don’t need to read this, although you still might find a few tips helpful. If on the other hand you’re not so interested, or maybe just don’t have the time, please schedule a full “tune up” with a local bicycle shop you enjoy working with. Remember too this is a 2-way relationship. No customer should ever have to tolerate lousy service (excepting of course my sunny disposition, on a 95-degree day with 98% humidity in southern Ohio, after restlessly sleeping on the ground overnight in a thunderstorm, and packing a wet tent with blistered fingers). If however you approach your shop wanting to be a good customer, they will do practically anything to help you become a truly great customer into the future. A mutually beneficial relationship with a small business is a fun experience, so I encourage you to foster such an opportunity.
Try to schedule your service about two to four weeks before departure for your trip, with consideration for how long the shop’s service center has promised for completion. You are training for a big ride, so don’t leave your bike for long. If possible schedule ahead for same day service, even if it means going in beforehand for an early assessment in case replacement parts need to be ordered. Also be sure to leave yourself at least a few days to ride your bike following the service, just so you’re confident all the kinks are worked out from any major work, and everything is operating smoothly and as you would expect.
Whether your shop includes these services and inspections in their “tune-up” service is irrelevant. Depending the style of your bike and its equipment, here’s a check-list of the items you’ll want addressed.
- Inspect the frame and fork for cracks.
- Inspect tires’ tread and sidewalls.
- Inflate tubes and confirm valves operate smoothly.
- carefully inspect shift cable housing condition, at the ends and at points that rub
- inspect shift cable wires for any corrosion or fraying, especially near the head
- inspect brake cables for corrosion or kinks
- lubricate under-bottom-bracket cable guide, replace if worn
- check handlebar, stem, seat-post, and saddle rails for cracks or other damage
- lubricate seat-post surface inside frame
- check stem and seat-post bolts for correct form of lubrication and torque
- check that brake and/or shift control levers are aligned and tight
- bars, stem, and saddle are properly aligned
- fresh handle-bar tape or grips (they’re often worn out, even when they don’t appear so)
- inspect rims’ braking surface, that it’s clean and not worn (concave)
- inspect rims for cracks, especially near spoke holes or braking surface
- check wheel hub bearings for smoothness and proper adjustment
- true wheels for straightness and roundness, and spokes are evenly tensioned
- check wheel quick-releases for condition and proper installation
- check crank bearings (bottom bracket)
- check crank attachment bolts
- inspect chain-ring teeth, proper orientation and alignment, and bolts’ lube and torque
- check pedal bearings
- check pedal jaws and cleat condition
- check pedal installation torque
- check condition of cassette cogs for broken or worn teeth
- check condition of chain for wear, or cracked links
- inspect condition and alignment of rear derailleur and hanger
- inspect and clean derailleur pulleys
- clean and lubricate chain
- check brake pad condition, wear, and adjustment
- check brake caliper (cantilever) for free movement and adjustment
- check shifting adjustments, both front and rear – especially limit screws
- check brake adjustment and performance
- check head-set bearing condition and adjustment
- check condition of water bottle cages and bolts
- check that computer is functioning properly
- confirm all other hardware, racks, fenders, accessories, are properly aligned, lubricated, and torqued
- it’s also nice when your frame is wiped down and tires are inflated
Since the most common and often challenging issues we deal with out on the road involve cables, let’s address some specific things to watch out for.
- Today’s indexed shifting systems (this means each “click” indicates a gear change) use a special type of cable housing. If you look at one end of a section of shift casing you’ll see a circular pattern (7) of tiny metal strands of wire. These give the casing its shape, and resist compression so the tensioned wire (3) inside can do its job pulling. The reason these strands run parallel to each other, as opposed the single coil used in brake housing, is to resist any effective change in length when you turn your handlebars.* This system isn’t nearly strong enough to withstand braking forces, but works well for shifting
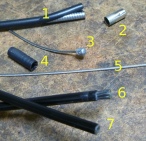
1. brake casing coils
2. brake ferrule
3. shift wire head
4. shift ferrule
5. shift wire
6. shift casing (worn out)
7. shift casing (new)as long as it’s kept in good condition. Within this circle of strands, again at the casing’s tip, you’ll also see a small plastic tube. This reduces the friction between the cable wire and the housing. Over time, more specifically with use, this lining wears out (6) and begins to increase the friction. This is bad, and why “changing cables” must include the sections of housing, not just the wires. Indeed good slick stainless wires will theoretically never wear out,** but they do usually end up frayed on the ends as they endure use and adjustments. Cables do not stretch! but individual components in fresh housing can compress a bit after some use. A skilled installer can do a lot to mitigate this, but it does explain why readjustments are often necessary shortly after a cable system is replaced.

* The coiled brake housing effectively changes length when you bend it, such as when turning the handlebars. You may be able to notice this if you watch for your brake caliper-arms to move slightly when you flop your front wheel side-to-side. The forces needed to activate your brakes require the compressive force the coiled casing (1) will withstand. Shifting forces are nowhere near as high, however are much less tolerant of unintended movement in the cable, otherwise you would have “ghost shifting” just from steering. If your brakes engage from steering then your brakes are set far too tightly.
** Cable wires (5) actually do often wear out, especially any place they bend and move over another surface. The primary example of this cannot easily be seen, as it happens inside the control lever. When you shift the lever the cable is wound on a steel “barrel” and over time this wears the cable, it frays, and will eventually break (B). If this happens it can be a nightmare for your mechanic to extract the broken section, and could potentially mean damage and replacement of a very expensive control. If your shifting performance appears to deteriorate suddenly and rapidly for no apparent reason, you should look into this possible cause immediately. Additionally, although there are many fine aftermarket cable systems available, sticking with the control manufacturer’s recommended cables, usually their own brand, not only helps to alleviate this issue but also provides some firm ground upon which to stand if you need to seek warranty support.
- Another important thing to watch for is wear-spots along the cables’ housing. These can occur anywhere the casings are rubbing each other, or are in contact with the frame, reflector bracket, etc. (A) Eventually the exterior vinyl coating wears thin and those little metal strands will burst out, and you will lose all ability to shift. Keep an eye on those spots, and get those cables replaced when the wear spots become noticeable. (This can
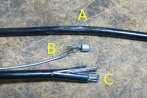
If you see, or suspect, any of these problems, you’re asking for big trouble
happen with brake housing too. Although losing your brakes is far more dangerous than losing your shifting, the coiled nature of the brake casing’s design won’t permit this bursting effect to happen should the vinyl wear off.)
- Those little plastic (occasionally metal) caps (2, 4) on the ends of your cable housing serve an important purpose, but they too wear out. When they do you can, not only lose your shifting performance but, do irreparable damage to your control levers. The caps (named ferrules) wear out inside on the ends, and those strands can burst out (C) and splay all over, stabbing and wrapping themselves around critical and fragile springs and pawls as you continue trying to operate the lever. If you sense this is about to happen, immediately cease all use of that shifter, and get those cables replaced.

